Ratatouille with Creamy Polenta

by Anna Glassman-Kaufman

No doubt you’ve seen the EXCELLENT movie, Ratatouille, about a little rat in Paris who just wanted to cook. The movie ends with beautiful plate of, you guessed it, ratatouille. If you haven’t seen the movie, go watch it tonight. You’re never too old for Pixar. And speaking of Ratatouille, August is peak ratatouille season. The most beautiful and flavorful tomatoes, eggplants, peppers and zucchini are ripening and abundantly available at local markets, and this epic French dish ties them all together perfectly.

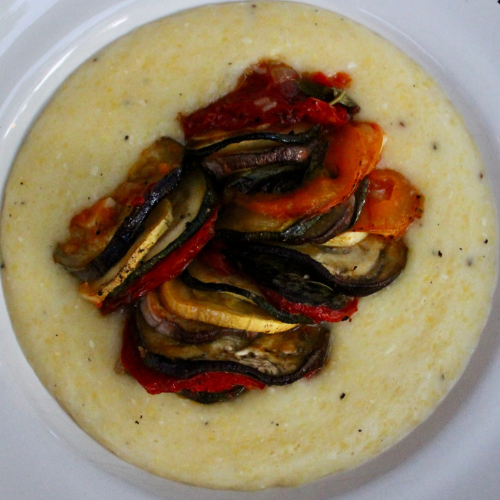
There are two ways to make ratatouille: you can cook the vegetables separately, then together, to form a cohesive sauce. OR, you can beautifully slice each of the vegetables, and arrange them in a baking dish over a light tomato-pepper sauce, alternating slices for a show-stopping look, then bake. And when do we ever take the easy way out? We’re going for a showstopper! Don’t be intimidated, though, it’s truly an easy dish that lets the ingredients shine, and is great to make in advance if you’re hosting a crowd for dinner. Ratatouille can be served right out of the oven or at room temperature.

Now for the polenta, one of my favorite Italian foods. Polenta is a cornmeal porridge from the north of Italy, up in the Alps. One of the most memorable meals of my life was at a trattoria in a tiny Alpine town of Alagna Valsesia, where after some of the best charcuterie I’ve tried, and of course a lot of red wine, our main course consisted of a huge pot of the cheesiest polenta I’ve ever seen, placed in the middle of the table to be served family style. The simplicity of the dish, paired with the insane mountain views to our side, made for the perfect evening. Though that polenta was served on its own, polenta (or cheesy polenta!) is often topped with various meat and vegetable stews, and polenta is the perfect base for ratatouille because the porridge soaks up the sauce and provides a little more substance to the meal, without overpowering the flavors that the vegetables bring to the dish. I used Brabander cheese in my polenta. Brabander is a goat’s milk gouda made by Fromagerie L’amuse. The cheese melts beautifully and offers a light nutty flavor and richness to the polenta, without overpowering any of the other flavors in the dish. We also just got in some new Caciocavallo cheese from Puglia, Italy. Caciocavallo is similar to provolone and would also melt beautifully into polenta, for a slightly milder flavor.

Last note before we start: this dish gives you the perfect opportunity to go to your local farmers market this weekend! Minnesota farms grow some of the best produce around, and there’s nothing more therapeutic than a morning spent at the farmers market, admiring the buckets of cucumbers, bouquets of squash blossoms, and bundles of bok choy that line the tents. A few market recs: St. Paul Farmer’s Market (Sat & Sun, 7am-1pm) is hyper local, requiring that every vendor grow and process their products within 100 miles of the market. And for a smaller neighborhood market, Kingfield Market (Sundays, 8:30am-1pm) offers a unique selection of produce, honey, and crafts.

INGREDIENTS:

Vegetables:

1 zucchini, sliced in ⅛ inch rounds

1 yellow squash, sliced in ⅛ inch rounds

2 Italian eggplants - smaller, thinner eggplants are best here, sliced in ⅛ inch rounds

4 ripe roma tomatoes, sliced in ⅛ inch rounds

2 tablespoons EVOO

1 large bunch of basil

Sauce:

2 tablespoons EVOO

1 small yellow onion, diced

1 red bell pepper, diced

4 cloves of garlic, diced

2 pints cherry tomatoes, sliced in half (I’m using Sungold, any variety will work well)

½ cup dry white wine (Pinot Grigio works well)

Salt and pepper to taste

Polenta:

1 cup polenta (coarse cornmeal)

5 cups water

1 cup whole milk (some people use all water, some all milk. I think this ratio gives it a nice richness, while keeping a dish light and elegant)

¼ lb grated cheese (we recommend the Brabander for a melty, flavorful cheese that’s not too overpowering. Caciocavallo would work beautifully here too!)

4 tbsp unsalted butter

4 tsp salt

Black pepper to taste

DIRECTIONS:

Preheat oven to 375 degrees.

Lay out your sliced zucchini, yellow squash, and eggplant on a sheet pan and lightly salt each side. This will bring out the moisture in the vegetables. Let rest about 10 minutes, then dab dry with a towel.

Heat 2 tablespoons of olive oil in a small saucepan over medium heat until shimmering. Add onions and peppers. Cover until the vegetables begin to sweat, and cook on low heat until soft. Then add garlic, salt and pepper. After about 30 seconds, add the cherry tomatoes, Cook, stirring regularly for 2-3 minutes, then add the white wine, turn heat to simmer, and cover for 5-10 minutes. Lastly, remove the lid, turn heat to medium, and cook the sauce to evaporate some of the wine and thicken. Using the back of a wooden spoon, lightly smash the vegetables against the side of the pot to bring the sauce together, but leave some chunks for texture.

When your sauce is finished, pour It into the bottom of a 9x13 baking pan. Start to line up your vegetables atop your sauce, alternating zucchini, squash, eggplant, tomato, and basil leaves until the pan is filled. Cover with tin foil and bake about 45 minutes, then remove foil and continue to cook for another 30-40 minutes until some of the excess liquid cooks off.

When you take off the foil, it’s time to start the polenta. Bring your water and milk to a boil over high heat in a large pot. Reduce heat to medium. Gradually, begin to add in the polenta, whisking constantly. Once you’ve added all of the polenta, reduce heat to simmer, cover the pan and cook, continuing to whisk every 5-10 minutes for about 30 minutes, until the polenta is thickened. Remove from the heat and add the grated cheese, salt, and butter. Whisk to combine. Serve immediately, topped with the ratatouille, or if your timing is off/you’re cooking in advance, you can always leave the pot covered and reheat with a little bit more milk to loosen.

Cook Like a Monger: Pasta alla Norma!

by Austin Coe Butler

In 1831 Vincenzo Bellini wrote an opera called Norma, and the name became synonymous with a masterpiece. This dish is called Norma because it’s awesome. An earlier version of pasta alla Norma was called pasta con la melanzane (pasta with eggplant) and was immensely popular in Sicily, particularly in the city of Catania. In honor of Bellini, a native of Catania, the dish was renamed. According to legend, Nino Martoglio, a prominent Sicilian writer, exclaimed while eating this dish, “chista è ‘na vera Norma! (this is a real ‘Norma!’)” 

Norma is the perfect summer dish, evoking the fragrance, freshness, and flavors of the season. The base of the dish revolves around lightly fried eggplants in a fresh tomato sauce—two vegetables that are stubbornly only good for the few fleeting months of the sundrenched summer. If you garden or visit the farmer’s markets, July is the month our first big crop comes in, and the markets finally fill with produce. I have some dark, slender Japanese eggplants and gem-like fairytale eggplants that I harvested and used in this dish. My basil persists on flowering this time of year, so I’m happy to prune it for the sake of this dish.

If you don’t want to fry the eggplant, you can simply cut them in half, place them cut side down on a baking sheet, and place them under the broiler till the skins darken and the flesh steams itself and softens. Scoop the flesh out and add it to the tomato sauce with the wine. 

If you know someone who insists they don’t like eggplant, make this dish for them. They just might exclaim that it is “Norma!”

Ingredients:

1 pack or 500 g of dried pasta, preferably a tubular shape like rigatoni

1 punnet of cherry tomatoes, quartered

2 eggplants, cut into half inch cubes

3 garlic cloves, minced

2 stalks of basil

1 cup of dry white wine, like Sicilian Grillo or Pinot Grigio

Pecorino Romano or Ricotta Salata

EVOO

Oil for frying (I prefer sunflower oil)

  1. Bring a large pot of abundantly salted water to a boil.

  2. Fry the eggplant in your oil of choice at 390º F for 3 to 4 minutes until lightly golden brown. Remove from the oil and drain on a plate lined with paper towels. Sprinkle the hot eggplant with salt. Cooked this way, the eggplant has a delicate crispness and delectable creaminess and sweetness. I personally like frying in a wok, as the convex shape of the pan allows you to fry more in less oil.

  3. Set a saucier or saucepan over medium heat. Add enough EVOO to cover the bottom of the pan, about four tablespoons or more. Once shimmering, add the garlic and fry until fragrant, about 30 seconds. Add the tomatoes and a two-finger pinch of salt. Cover and stir occasionally. The juice from the tomatoes and olive oil will turn opaque, almost creamy. Add one stalk of the basil, whole or with the leaves torn, along with half the fried eggplant and the wine. Simmer for a few more minutes for the wine to reduce.

  4. Cook the pasta. Two minutes before al dente, transfer the pasta to the saucepan along with a ladle of the pasta water. Toss to combine (SPADELLARE!!) until the pasta is cooked through and married with the sauce. Serve immediately on a warm plate and top with the remaining eggplant, a grating of Pecorino Romano, fresh basil torn over it, and a crack of black pepper. Buon appetito!

Cook Like a Monger: Beet Spaghetti

by Austin Coe Butler

The simplicity and flavor of this dish is rivaled only by its immediate visual appeal. Just be sure to wear an apron when making it! It is inspired by a pasta dish created by Avner Lavi at Cento Pasta Bar in Los Angeles. Originally, this dish is made with poppy seeds and ricotta, but over the years I’ve found I prefer to leave the poppy seeds out as I don’t have them around the house and substitute chèvre for ricotta as chèvre and beets are a natural pairing. The sweetness and earthiness of the beet purée is balanced by the acidity of the chèvre and the freshness of the chives, all rounded out with a pleasant, toasty backbone of browned butter.

Serves 2

250 g or 1/2 package of Ma’kaira Chitarra or long pasta like spaghetti

Blakesville Creamery Fresh Chèvre

1 medium red beet

Chives 

Extra Virgin Olive Oil

3 tablespoons butter

Salt and pepper

Roast the beets. Preheat your oven to 400º F. I use this opportunity to roast a whole bunch of beets, as they’re great to have in the kitchen. Top and tail the beets, leaving the skins on. Coat the beets in olive oil and a sprinkle of salt, then wrap each tightly in aluminum foil. Place them on a rimmed baking sheet and cook. Depending on their size, this can take 40 to 60 minutes. Check on them every 20 minutes for doneness, when a knife can go through the beets with little resistance.

Make the beet purée. Once cool to handle, reserve all the beets except one. The wrapped beets can last at least a week in the fridge. Peel the beet. The skin can be removed easily with your fingers or a paper towel. Cube it and place it in a blender. Add a generous pinch of salt, about a teaspoon, and a splash of water before blending for one minute until smooth.

Brown the butter. Brown 3 tablespoons of butter over low to medium heat for about 5 minutes. The butter will pass from a milky yellow color that foams and spits to a clear brown. The milk solids in the butter will caramelize and the butter will take on a pleasant, nutty aroma. 

Finish the sauce. Add the beet purée to the brown butter and stir to combine.

Cook the pasta. Bring a large pot of well salted water to a boil. Cook the pasta two minutes shy of al dente according to the package instructions. Remove the pasta and add it to the saucepan along with a ladle of the pasta cooking water. Toss to combine and finish cooking.

Garnish. Serve the pasta in a tight bird’s nest by using tongs and a soup ladle. Garnish with a spoonful of chèvre and top with a generous amount of finely sliced chives. Serve immediately.

Cook Like a Monger: Savory Scones

by Anna Glassman-Kaufman

Two scones on a wooden board

We’re back with another baked good this week. These savory scones are the perfect last minute addition to any summer brunch. They come together in about 45 minutes and are a great way to use up any cheese or greens you have in the fridge.

A couple of notes:

Cheese - I love to use something soft and creamy with a little bit of funk, like anything from Alemar Cheese (local!), but any flavorful cheddar or gruyere works well in these as well! Most importantly, you just want a cheese with lots of interesting flavor that will come through in every bite. You don’t want the cheese to get lost behind the herbs. If you go with something softer, be careful to mix the cheese in last and JUST until combined, to keep the chunks of cheese intact. If you go with an aged cheese of any kind, shred the cheese or cut into ¼ inch cubes.  Today, I’m using Bleu Mont Cheddar which is earthy, nutty, and pairs well with the chives in the scone.

Flour - I love to use at least 20% whole wheat flour in anything I bake. Flour is not just an ingredient to hold the rest together, it can add its own depth of flavor and texture, and I want to celebrate it. So we’re using 50% whole wheat flour in these scones. The other half is All-Purpose, and if that’s all you have on hand, certainly feel free to go 100% AP. You just may want to cut back the buttermilk by a tablespoon or two if skipping the whole wheat, as the whole wheat flour tends to absorb a bit more liquid than sifted flour.

Yield: 8-10 scones

Ingredients:

1 Cup All-Purpose Flour

1 Cup Whole Wheat Flour

½ Tsp Baking Soda

½ Tsp Baking Powder

½ Tsp Salt

2 Tbsp Sugar

6 Tbsp Salted Butter, COLD and cubed into ½ inch pieces

½ Cup + 2 Tbsp Buttermilk

1 Egg

3 Tbsp Green Onion or Chive, minced

6 oz cheese, cubed or shredded

2 Tbsp Milk


1. Combine all dry ingredients in a mixing bowl.

2. Add the chunks of cold butter and use your fingers or a dough cutter to cut the butter into the dough, until you have a course meal with some pea sized chunks of butter.

3. Add in your egg, buttermilk herbs and cheese chunks and mix with your hands until the dough just holds together.

4. Wrap in plastic and rest for 5-10 minutes. Meanwhile, preheat your oven to 400 degrees and line a baking sheet with parchment paper.

5. Drop the dough into 8 equal sized scones. They do not have to be rounded, the uneven edges will give you a crispy exterior when baked.

6. Brush each scone with a little bit of milk and sprinkle with flaky salt.

7. Bake in 400 degree oven for 15-18 minutes until the exterior is golden brown and a toothpick comes out clean.

8. Enjoy while still warm with little bit of extra salted butter!

Cook Like a Monger: Whipped Feta with Chili Crisp & Fried Zucchini

by Anna Glassman-Kaufman


We all know chili crisp is having a moment, and we’ve written about it on this blog before, so I won’t write too much here, but know that the Kari Kari Chili Crisp is the thing you’ve been missing in your kitchen. It makes any mediocre dinner an excellent one, adding not only a bit of heat but also garlicky umami goodness. There’s really no going wrong with this stuff.

Now we bring in the feta. Feta is a sheep’s milk cheese originating in Greece. The curd is salted and dry aged for a brief period before aging in brine, a very salty water solution. It’s highly acidic, so it doesn’t melt as well as other cheeses and is most often served cold or room temperature. But when blended with a bit of brine, feta turns into a silky smooth dip that is the perfect base for any toppings that inspire you, and that’s what we’re doing today.

Alright one final component: the zucchini. I don’t know about you, but my zucchini plants go absolutely crazy sometime around mid-summer and produce more than I could ever imagine eating. So I’m always looking for new ways to use them up because let’s be real, it’s not always the most exciting and flavorful veggie, especially after you accidentally let it grow a day too long and it’s the size of your arm. But if you watched Stanley Tucci’s “Searching for Italy”, you will surely remember the Spaghetti all Nerano he ate in the Calabria episode. The zucchini were sliced thinly and twice fried to bring out all of the sweetness and flavor they have to offer, and that’s what we’re emulating in this recipe. I don’t quite go so far as to deep fry them, but I’ve found that slicing zucchini thinly and shallow frying in olive oil can achieve a texture reminiscent of the one I imagine in this epic pasta dish, and certainly makes them taste delicious.


8 oz Essex Sheep’s Milk Feta

2 tbsp Feta Brine

Zest of One Lemon

1 Medium Zucchini, thinly sliced, lengthwise

1 tbsp Kosher Salt

¼ cup Extra Virgin Olive Oil

1 tbsp Kari Kari Chili Crisp

1 tbsp Basil Leaves, julienned

Thinly Sliced and Toasted Bread to dip - I’m using Baker’s Field Table Bread of course


Lay zucchini slices down on a baking pan and salt the surfaces with the 1 tbsp kosher salt. This helps pull excess moisture out of the zucchini. Set aside for 10 minutes.

Meanwhile, blend feta, lemon zest, and brine in a food processor about 3-5 minutes until silky smooth. If it still feels a bit too stiff, add another tablespoon of brine to smooth it out. Spoon the whipped feta onto your serving dish and smooth out surface, creating a shallow well in the center. Refrigerate until ready to assemble and serve.

Use a towel to pat the zucchini dry.

Heat up a sauté pan over medium heat and add ¼ cup olive oil. Wait another minute until the oil is sufficiently hot and begin adding zucchini slices. You will likely need to fry them in several batches. Fry for a couple minutes on each side, until lightly browned and crisp, but not burnt. Then transfer to a clean plate, lightly salt and pepper, and move on to the next round.

When you’ve finished frying and your zucchini has fully cooled, top the plated whipped feta with the zucchini and spoon a tablespoon of Kari Kari Chili Crisp over the top. Lastly, garnish with the julienned basil.

Serve with toasted bread and enjoy!


P.S. for the iconic Spaghetti alla Nerano recipe, look here!

Cook Like a Cheesemonger: Panzanella Pasta Salad

By Austin Coe Butler

This hybrid between a creamy pasta salad and a panzanella, a bread and tomato salad with a tangy vinaigrette, is the perfect dish to bring to your next cookout, picnic, potluck, or block party. It’s bright, creamy, tangy, refreshing, and, best of all, will guarantee you leave with a nice empty bowl that’s easy to clean. It’s best made in advance, great at room temperature, easy to scale up, and simple to modify for the occasion. 

I want to thank the customer that shared with me the inspiration for this recipe. (You know who you are!) Last weekend we featured our custom washed Grillin’ Cheese from Blakesville Creamery that is washed in Dampfwerk’s Barrel Aged Gin. It’s a Croatian inspired cheese that is essentially a puck of chèvre wrapped in grape leaves that have been soaked in a spirit. This cheese is a favorite of this customer’s daughters, and it’s always a joy when I see them picking it up. While we were talking at the cheese counter he mentioned that he had substituted the Blakesville Grillin’ Cheese for halloumi in a New York Times recipe by Yossey Arefi for orecchiette salad with halloumi croutons. In addition, he had removed the cilantro, red onions, and arugula, and added in bread croutons. The judgment of his daughters? This version was even better! And it was even better the next day! This is how great recipes are born.

1 pt cherry tomatoes, quartered

4 tablespoons extra virgin olive oil

2 tablespoons red wine vinegar like La Guinelle Vinaigre de Banyuls

Kosher salt

Black pepper 

8 ounces orecchiette or other small pasta

1 Blakesville X Dampfwerk Grillin’ Cheese

1 bag France 44 garlic crostini

3 Persian cucumbers or 1 English cucumber deseeded

2 cups arugula (optional)

½ cup chopped cilantro or parsley

½ cup chopped mint

¼ finely chopped red onion (optional)

  1. Add the tomatoes, 2 tablespoons of the olive oil, red wine vinegar, salt, and pepper in a small bowl and leave them to marinate while you prepare the rest of your ingredients.

  2. Bring a large pot of salted water to a boil.

  3. Grill or pan fry the cheese. Grilling the cheese is a great option because it imparts smoke to the cheese, otherwise, pan frying it works great, too. You’re looking to heat the cheese through and soften it. I did this directly over my gas burner on low heat, flipping it from time to time, for about 5 minutes, just to get some char. Once soft, remove it from the grape leaves, add it to a large bowl, and mash it into a paste.

  4.  Cook the pasta. It’s especially important with pasta salad to cook the pasta al dente, usually about 2 minutes short of the manufacturer's recommended cook time. Often the pasta in pasta salads has been obliterated—it’s soft, mushy, slimy, and disintegrates. Al dente pasta is also “thirsty” and will soak up the vinaigrette. Once cooked, strain the pasta and add it to the large bowl along with the tomato vinaigrette. Stir to combine the pasta, tomatoes, and cheese.

  5. Add all the remaining ingredients to the large bowl and stir to combine. The mixture will seem a little stiff, so feel free to add more olive oil and vinegar, but give it time to rest while the pasta and crostini absorb the liquid and soften. What’s great about the addition of the crostini is that since they are toasted, they don’t turn to mush the way fresh or even stale bread does when it soaks up liquid. Instead, it retains its shape and a bit of spring, providing a nice chew and even a bit of crunch the next day. 

  6. While this pasta salad will be ready to go as soon as you make it, I suggest letting it sit overnight. If you would like to add the arugula, add that on the day of serving so it doesn’t wilt along with a few more freshly chopped herbs and a scattering of crushed crostini for crunch.

Cook Like a Monger: Risotto

by Anna Glassman-Kaufman

We’re going back to the basics this week with a classic risotto recipe. Don’t let risotto intimidate you. It may be a bit of a labor intensive process, but it never disappoints. Master this basic recipe and get ready to customize with seasonal produce and herbs, new stocks/broths, and unique cheeses.

Serves 2-3

Ingredients:  

2 tablespoons extra virgin olive oil 

¼ cup shallot, minced

1-2 cloves garlic, minced  

1 cups carnaroli (or arborio) rice  

3 cups chicken stock  

½ cup white wine, we recommend chardonnay  

½ cup Parmigiano-Reggiano, freshly grated, plus extra for garnish 

1 tablespoon unsalted butter  

Salt and pepper to taste 


Method 

  1. Bring chicken stock to a simmer in a medium saucepan. 

  2. Meanwhile, in a large heavy bottomed pot, sauté shallot and garlic in olive oil on low/medium heat until soft, but not browned. Season with salt and pepper.  

  3. Add rice and stir with a wooden spoon, until the rice is evenly coated with olive oil. Continue to stir for one minute until the rice has a nutty aroma.  

  4. Add the white wine and stir constantly until it is all absorbed into the rice.  

  5. Add about ½ cup of simmering stock and stir until nearly all of the liquid is absorbed. Then, add another ½ cup of stock and stir. Continue this process until all the stock is added (15-20 min) and risotto is al dente, creamy, and a little bit soupy.  

  6. Turn off heat and stir in grated Parmigiano-Reggiano and butter.  

  7. Garnish with a drizzle of extra virgin olive oil, more grated Parmigiano-Reggiano, and freshly cracked black pepper. Serve immediately.  

Cook Like a Monger: Berry Ricotta Cake

by Anna Glassman-Kaufman

When I was 18, I took a weekend trip to Portland, Maine, where I was introduced to a bakery called Standard Baking Company. To me, the bakery was perfect. They sold breads and pastries in a simple storefront, somehow perfectly toeing the line between delicate and rustic. That visit, and many more during my four years living in Boston, sent me down a path, dedicating my career to world of food & beverage, which started in baking. And on that first visit, I picked up a copy of their cookbook which contained the recipe that inspired the one I’ve shared with you below: the Berry Ricotta Cake.

A few years later, I found myself volunteering on a goat farm in Italy, with more ricotta than we knew what to do with. Ricotta is a byproduct of cheesemaking; made from whey, so with every batch of cheese we made, we made a batch of ricotta too. I started making this cake for my farm hosts - filling it with strawberries from their garden, sour plums from the tree outside their house, anything I could get my hands on. We’d carry it up the mountains and after a hard day’s work shepherding & milking goats, it always hit the spot. It’s a dependable recipe, and truly versatile.

This berry ricotta cake is the perfect example of a simple recipe that lets the quality ingredients shine. Ricotta has a magical quality in cake, giving the cake a moist and almost custardy texture. Adding ricotta to your batter ensures that your cake won’t dry out, whether kept in the fridge or on the counter. And it lets the cake stand alone, with no need for frosting. This is truly a snacking cake, made to pair with coffee or tea.

This recipe is written for a standard loaf pan, but feel free to adapt it to your needs. I’ve made this as a loaf, a bundt (as in this picture), a round cake, cupcakes. As long as the batter only fills about ⅔ of the pan you’re using, you’re good to go. You can add whatever citrus, berries, or other fruit you have on hand. And I promise you, once you’ve baked a cake with ricotta, you won’t go back.

Ingredients:

  • 10 tbsp salted butter, softened  

  • 1 ¼ cup sugar  

  • 10 oz Calabro Whole Milk Ricotta  

  • 3 medium eggs  

  • 1 tbsp lemon zest  

  • 1 ½ tsp pure vanilla extract  

  • 1 ½ cups all-purpose flour  

  • 2 tsp baking powder 

  • ½ tsp salt  

  • 1 ½ cups fresh berries (whole if small or cut into about ½ inch pieces if large) 

 Method:

  1. Preheat oven to 350°F. 

  2. Line a 9x5 inch loaf pan with parchment paper, or grease and flour all sides.  

  3. Using a hand mixer or stand mixer with paddle attachment, cream butter and sugar until light and fluffy. Scrape bowl well.  

  4. Add ricotta and mix on low speed to combine.  

  5. Add one egg at a time, beating well and scraping between each addition. Then add lemon zest and vanilla extract.  

  6. Sift the dry ingredients together, and add in one addition, beating on a low speed until just combined.  

  7. Fold in berries by hand.  

  8. Pour into your loaf pan and bake for 55-60 minutes, rotating the pan halfway through the bake. The cake will be a rich brown color and a toothpick should come out clean from the center.  

  9. Let your cake cool completely, then turn out and slice to serve.  

Thai Beef Salad

 
Bowl of Thai beef salad, featuring fresh vegetables and herbs & beef.
 

by Austin Coe Butler

This recipe is inspired by a Thai dish called Yum Nua, which quickly became a favorite in our house. As it relies on produce that can be grown well even in greenhouses like cucumbers and cherry tomatoes, this Thai beef salad is always satisfying whether it’s been grilled over charcoal on a summer’s day or pan seared on a winter’s night. 

The dressing makes this recipe sing. It’s similar to a Vietnamese nuoc cham, a tangy, salty sauce of lime juice, sugar, and fish sauce, but it has the addition of cilantro stems, garlic, and chilis for an herbaceous heat. Unlike parsley or oregano, cilantro stems have almost as much flavor in them as the leaves, and when cut finely or crushed, they’re delightful to eat and not stringy at all. Don’t be afraid of the fish sauce! While this may seem like an unfamiliar ingredient, think of it as a southeast Asian worcestershire sauce. It has a deeply satisfying salty and umami quality that compliments and accentuates meat, vegetables, and, a personal favorite of mine, mushrooms. You can find the Red Boat brand fish sauce in many coops and high-end grocery stores, or a variety of brands at your nearest Asian grocery store. I prefer the Squid brand (it doesn’t contain squid, it’s just called that!)

For the beef, you can use whatever cut you like, but I prefer using longer, thinner cuts like skirt, bavette, flank, or flat iron, all of which we readily carry in the meat case. These cuts benefit from a quick sear and cutting against the grain. If you don’t eat beef, you could substitute pork chops or chicken thighs to great success.

For the salad: 

1 lb. beef cut of your choice, but preferably longer, thinner cuts like skirt, bavette, flank, or flat iron. 

1 small red onion, sliced thinly

1 English cucumber, deseeded and sliced thinly on a bias

1 pint of cherry tomatoes, halved

Mixed greens

¼ c. cilantro leaves

¼ c. mint leaves

Crushed peanuts to garnish

For the dressing:

1 tbsp cilantro stems

1 to 2 cloves garlic

3 tbsp fish sauce

3 tbsp lime juice

2 Thai bird’s eye chilis

1 tbsp neutral oil

2 tsp sugar

Salt to taste

Directions

  1. At least 30 minutes before you plan to cook the steak, pull it from the refrigerator to temper it and season generously with salt.

  2. Prepare the dressing. Add the cilantro stems, garlic, Thai chilis, sugar, and just a pinch of salt to a mortar and pestle and work them into a paste. You can also use a food processor. Next, add the fish sauce, lime juice, and oil and stir to combine. Taste for seasoning and adjust accordingly. It should be balanced between the tart acidity of the limes, the salty umami of the fish sauce, and the herbaceous heat of the aromatics.

  3. Prepare the base of your salad. Halve the cucumber and remove the seeds with a spoon, then cut half moons at an angle. If you want to take the edge off the raw red onion, you can place it in a bowl of ice water for a few minutes. I like to lightly salt the tomatoes to draw some of the juices out and add them to the salad dressing, contributing some of their sweetness. Combine all the vegetables including the mixed greens, cilantro leaves, and mint in a large bowl.

  4. Over high heat, grill or pan sear the beef to your desired doneness. For medium rare, that’s about 4 minutes each side. Allow the beef to rest for ten minutes.

  5. Once rested, cut the beef into strips against the grain. This may involve first cutting the beef along the grain into shorter sections and then cutting against the grain. I like to cut the beef at a 45º for wide strips.

  6. Dress the salad to your liking, reserving a few spoonfuls of the dressing. You can either add the beef directly to the salad when you toss it, or you can serve it on top of the tossed salad.

  7. Garnish with more cilantro and mint leaves, the crushed peanuts, and a final, generous spoonful or two of the reserve dressing over the beef. This salad is great warm, room temperature, or cold, so serve it however you’d like!

Cook Like a Monger: The Bánh Mì Burger

by Matt Gruber

Alright, let's talk bánh mì: a Vietnamese staple which dates back to the 1950's; a phenomenal sandwich on a short baguette, typically with some combination of pork, cilantro, cucumber, pickled carrots and daikon. You will see the French influence in certain variations as well, sometimes with a pâté or some form of mayonnaise.

It wasn't until after the Vietnam War that we began to see this sandwich more often in the US. Fast forward in time a bit and we start to see some new innovations in food happen. People start getting creative and combining food staples from around the world: one region’s cooking techniques with another’s cut of meat. Some of my favorite dishes are the culinary lovechild of two regions: gyro tacos, kimchi avocado toast, deep fried bok choy chaat. In 1988 the term "fusion cooking" was used in a speech given by Norman Van Aken (who has been called the Walt Whitman of American cuisine), coining the phrase we use today for such cuisine.

Here, I'm channeling one of the fusion godfathers, Wolfgang Puck, and transforming the bánh mì into a new summer staple... the bánh mì burger.

Ingredients:

1# Ground Pork (will make ~3 burgers)

Rose Street Bakery’s Japanese milk buns

Salt and Pepper to taste

1/4 cup cilantro, chopped

2-3 carrots, grated

1-2 baby cucumbers, sliced into coins

1 tsp ginger, minced

1 tsp garlic powder

1 1/2 tablespoon black garlic molasses

1/4 cup soy or ponzu sauce

1/2 red onion, sliced into moons

1 lime

1/4 cup white vinegar

 For the adventurous crowd, 1 jar of pork liver mousse

Directions:

In a bowl, combine juice of half lime, 1 tsp sugar, sliced onions, salt and pepper, 1/4 cup vinegar- set aside to quick pickle.

In a second bowl, mix your pork, garlic powder, ponzu/soy sauce, cilantro, black garlic molasses, then form into patties.

Preheat your cast iron or favorite heavy bottom pan on medium heat, place burgers in pan once preheated and cook for 4 1/2 - 5 minutes per side. Once cooked, pull off and let rest for 2-3 minutes, assemble burger with pickled veggies on top, garnish with cilantro if desired (and the pork liver mousse) and enjoy!

Order Online